Removing paint from windows can be a challenging task, especially when old layers have hardened over time or stubborn paint spots on glass refuse to come off. Knowing how to approach this task is essential for a clean and damage-free finish. This complete guide will show you the safest methods for cleaning paint off windows, including both manual scraping and chemical techniques.
You will learn window paint removal tips, razor blade paint removal, and effective DIY window restoration methods. By following these steps, you can restore clarity to your glass surfaces, prevent scratches, and achieve a streak-free shine on all types of windows.
Why Paint Sticks to Glass and Common Problems
Paint adheres to glass because its smooth surface allows a strong bond as it dries. Oil-based paints are especially persistent, forming thick layers that resist simple wiping. Water-based paints, although thinner, can seep into corners and edges, creating streaks that are hard to remove without proper techniques. Common problems include scratches from aggressive scraping, streaked or cloudy glass, and leftover residues that attract dirt over time. Environmental factors, like Arizona’s heat, make paint dry faster and stick more stubbornly, increasing the difficulty of removing old paint layers. Cleaning paint off windows requires patience and proper method selection to avoid permanent damage.
Tools and Materials You’ll Need
The right tools and materials can make the difference between an effortless job and a frustrating experience. Effective window paint removal tips include using scrapers, razor blades, chemical removers, microfiber cloths, gloves, and protective eyewear. Each tool serves a specific purpose: scrapers lift thin paint layers, razor blade paint removal allows precise work along corners, and chemical paint stripper for windows dissolves thick, stubborn layers. Microfiber cloths prevent streaking during final cleaning, while gloves and goggles protect the skin and eyes from chemical exposure. Having all tools ready before starting ensures a smooth workflow and reduces risks of accidents or incomplete cleaning.
Selecting the proper materials depends on the type of paint and the window’s age. For oil-based paints, chemical removers or gentle heat applications work best, while water-based paints often respond well to scraping and household paint remover for glass. Using small, hand-held tools allows more control for detailed work, whereas larger scrapers accelerate removal of wide glass areas. Preparing your workspace by protecting surrounding surfaces and applying painter’s tape reduces the chance of accidental damage. Best tools to remove paint from windows are essential for safety, speed, and achieving a streak-free finish, especially when tackling multiple stubborn paint spots on glass.
Essential Equipment for Safe and Effective Paint Removal
Essential equipment includes scrapers, razor blades, microfiber cloths, chemical removers, gloves, and safety goggles. Scrapers lift thin paint layers, while chemical solutions dissolve tougher paint. Microfiber cloths prevent streaking and residue. Gloves and goggles protect your skin and eyes, ensuring safe DIY paint removal techniques. Selecting the right tool for the paint type reduces the risk of scratches.
Safety Precautions Before You Start
Safety is critical when removing paint from windows. Wearing gloves, goggles, and protective clothing prevents chemical burns or injuries from sharp scrapers. Ensure proper ventilation when using chemical paint removers, as fumes can be hazardous indoors. Cover window frames and surrounding areas to avoid accidental chemical damage or staining. Arizona’s heat can amplify chemical reactions, so working during cooler hours or shaded areas is advisable. Preparing the workspace carefully not only protects you but also ensures the paint removal process is efficient and damage-free.
Knowing your limits is another key aspect of safety. Start with small sections to test the effectiveness of your chosen method. Avoid pressing too hard on delicate or old glass, as this may result in scratches or cracks. Taking time to understand the risks of each method and monitoring progress closely ensures successful results. Protecting window frames during paint removal prevents permanent marks on the frame and keeps your DIY window restoration project safe and effective.
Protecting Yourself and Your Windows
Wearing gloves and goggles protects hands and eyes. Ventilation prevents inhaling harmful fumes. Cover frames to avoid chemical damage. Testing small sections first ensures safe and effective paint removal. Safely removing paint from glass surfaces requires patience and careful monitoring.
Methods for Removing Paint from Windows
There are two main methods for removing paint from windows: mechanical and chemical. Mechanical techniques include scraping, using razor blades, or applying heat. These methods are immediate and effective for thin paint layers but can damage glass if not applied carefully. Chemical methods, including chemical paint stripper for windows, involve applying a solution that dissolves paint, making it easier to wipe away. While chemical removers are gentler on glass, they require longer wait times and careful handling to avoid damaging window frames. Combining both methods often produces the best results, especially for stubborn paint spots on glass.
Mechanical removal is ideal for small areas and precision work along window edges, while chemical removers excel at loosening thick, stubborn paint layers. Choosing a method depends on the paint type, window condition, and environmental factors such as sunlight, which can dry paint quickly in regions like Arizona. Comparing the efficiency, safety, and cost of each method helps homeowners select the most suitable approach. Using these techniques systematically prevents scratches and streaks, ensuring clean, clear windows. How to scrape paint without scratching is critical for achieving a smooth, damage-free result.
Comparing Mechanical vs Chemical Techniques
Mechanical scraping is fast but risks scratches. Chemical removers dissolve paint gradually and prevent damage. Combining both methods often ensures cleaner, faster results. DIY paint removal techniques often mix these methods to achieve precision and efficiency.
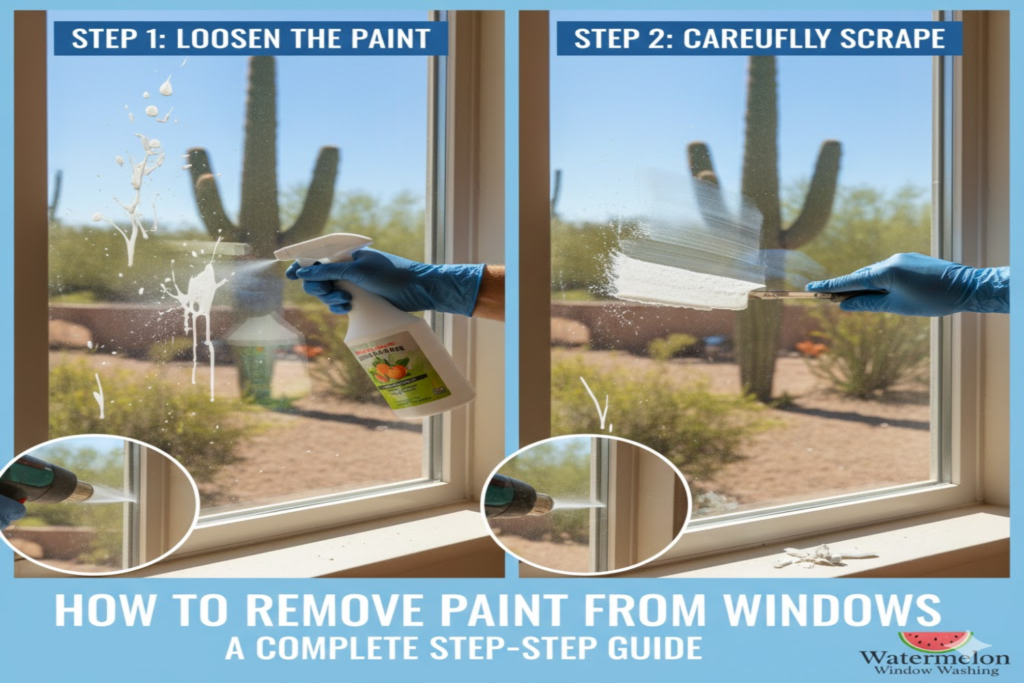
Step-by-Step Guide to Removing Paint Manually
Start by softening the paint with a damp cloth or mild solvent. Hold a razor blade or scraper at a 45-degree angle and gently lift paint, working from the edges to the center. Avoid forcing stubborn paint, as this can scratch the glass. For thick or old layers, repeat the softening and scraping process instead of applying excessive pressure. Arizona’s intense sun may harden paint quickly, so extra time for softening may be needed. Following this step-by-step guide to clean paint from windows ensures that layers come off without damaging the glass.
After lifting the paint, clean the window with water and a microfiber cloth to remove residue. Inspect closely for streaks, residual paint flakes, or tiny stubborn spots. Repeating the process in small areas ensures complete removal without compromising the glass surface. Manual scraping is especially useful for corners and narrow window sections where chemical solutions may not reach effectively. Precision and patience are key to avoiding scratches when removing paint, making the manual process indispensable for a professional-looking finish.
Scraping and Razor Blade Techniques
Hold the razor blade at a 45-degree angle and lift paint gently. Work along edges first and avoid pressing hard to prevent scratches. Small, controlled strokes give the best results. Homemade solutions to remove paint from glass can be combined with scraping for extra efficiency.
Using Chemical Paint Removers Safely
Chemical paint removers are a powerful way to tackle stubborn layers that scraping alone cannot remove. The first step is selecting a remover suitable for the type of paint on your windows. Oil-based paints usually require stronger solvents, while water-based paints respond well to milder household paint remover for glass. Apply the remover evenly across the paint surface using a soft brush or cloth, following the manufacturer’s instructions. Let the solution sit for the recommended time to soften the paint. Patience is key, as rushing the process can damage glass or leave streaks. Ensuring good ventilation is critical, especially when working indoors or in enclosed areas, as fumes can irritate your skin, eyes, and respiratory system.
Once the paint has softened, gently scrape or wipe it away with a scraper or microfiber cloth. Avoid aggressive scraping, as this may scratch the glass or damage window frames. After removal, clean the surface thoroughly with water or mild soapy solutions to remove chemical residues. For best results, follow up with a clean microfiber cloth to dry the glass. Timing is especially important in warmer climates like Arizona, where heat can accelerate chemical reactions. Using chemical paint removers safely ensures thorough paint removal while preserving the integrity of your windows.
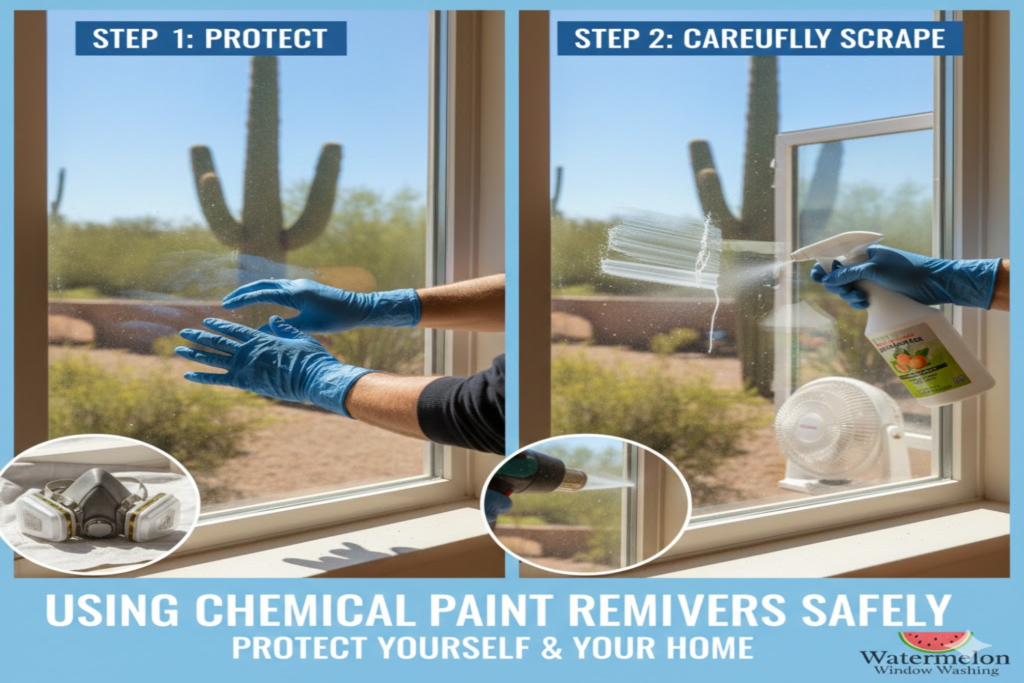
Applying Solvents and Cleaners Correctly
Apply chemical removers evenly and follow the recommended wait time for maximum effectiveness. Gently wipe or scrape softened paint and always clean the glass thoroughly afterward. Proper technique prevents streaks, residue, and accidental damage to frames. Combining this with manual scraping ensures even stubborn paint spots on glass are removed completely.
Top Tips for Removing Paint from Windows Safely and Effectively
- Always identify the type of paint before starting removal to choose the right method.
- Use a razor blade or scraper carefully at a 45-degree angle to avoid scratches.
- Apply chemical paint removers only in well-ventilated areas and follow instructions.
- Protect window frames and surrounding surfaces with painter’s tape or covers.
- Start with small test areas to check effectiveness and prevent damage.
- Use microfiber cloths to wipe residue and achieve a streak-free finish.
- Soften thick or old paint layers with heat or chemical solutions before scraping.
- Clean windows thoroughly after removal to prevent leftover chemical stains.
- Consider professional help for old, fragile, or heavily painted windows.
Removing Paint from Window Frames and Sills
Window frames and sills require a delicate touch, as they are often more vulnerable to damage than the glass itself. Wooden frames should be treated gently with mild chemical removers or eco-friendly paint removal solutions. Vinyl frames can withstand slightly stronger solvents, while aluminum frames are more robust and can tolerate a wider range of removers. It is essential to cover surrounding surfaces and protect walls, floors, and furniture from spills. Careful attention prevents dents, discoloration, or permanent stains. In Arizona homes, older wooden frames may be dry or cracked, requiring extra caution to avoid splitting or chipping the wood during paint removal.
After removing paint from frames, wipe down all surfaces with a damp cloth to remove any leftover chemical residue. Inspect closely for spots that may require additional attention, but avoid using harsh scraping that can mar the surface. Repeating the process in small, controlled sections ensures a clean, professional finish. Treating frames carefully preserves the aesthetic and structural integrity of the window while completing the DIY window restoration successfully.
Tips for Wooden, Vinyl, and Aluminum Frames
Select removal techniques based on the frame material. Wooden frames require gentle methods, vinyl tolerates mild solvents, and aluminum can handle stronger solutions. Protect surrounding surfaces and handle edges carefully to avoid dents or scratches.
Cleaning and Polishing the Window After Paint Removal
Once all paint is removed, windows may appear streaked or cloudy, even if the paint itself is gone. A solution of water and vinegar or a specialized glass cleaner works well to achieve a streak-free finish. Use a microfiber cloth to wipe the surface in circular motions, paying special attention to corners where residue often accumulates. Buffing the glass with a soft dry cloth enhances clarity and shine. Cleaning windows after painting ensures no chemical or paint residue remains, leaving the surface completely restored.
Polishing also prevents dirt from clinging to small residual paint particles. In warm, dry regions like Arizona, streaks and dust are more noticeable, making thorough polishing essential. A consistent cleaning routine, including wiping corners and edges, helps maintain the glass’s clarity for longer periods. Glass cleaning techniques, when combined with proper polishing, produce a smooth, transparent surface that looks professionally maintained.
Achieving a Streak-Free, Shiny Finish
Use water, vinegar, or a glass cleaner with circular wiping motions. Buff with a dry microfiber cloth to restore shine. Paying attention to corners ensures all residue is removed and the window surface is clear and reflective.
Preventing Future Paint Damage
Preventing paint from sticking to windows in future projects is easier than removing it repeatedly. Cover windows with plastic sheets or painter’s tape before any painting begins. Clean up spills immediately with a damp cloth to prevent stubborn paint spots on glass. Applying protective films on windows during painting offers long-term protection and reduces the likelihood of damage. In Arizona, where heat can dry paint faster, taking these precautions ensures the glass remains pristine even during extended painting projects.
Teaching household members proper painting habits also helps prevent accidental messes. Consistent use of coverings, immediate cleanup, and protective films significantly reduce the need for future paint removal. Regular inspection and routine window cleaning maintain clarity and extend the life of the glass surface. Prevent paint stains on windows by following these preventative steps every time you paint, ensuring a clean, hassle-free environment.
Protective Measures During Painting Projects
Use painter’s tape and plastic covers before painting. Clean spills immediately and apply protective films on windows to prevent stubborn paint adhesion, especially in hot climates like Arizona.
Professional Help vs DIY: When to Call an Expert
Some paint removal tasks are better left to professionals, particularly when windows are old, fragile, or covered with multiple thick paint layers. Professionals have specialized tools, chemical knowledge, and experience that allow them to remove paint without damaging glass or frames. For residents in Arizona, experts understand the local climate’s impact on drying paint and can adjust techniques accordingly to ensure safe, effective results. Hiring professionals saves time, reduces stress, and ensures the window is restored to its original clarity.
DIY paint removal is feasible for small areas, fresh paint, or minor spots. However, knowing your limits prevents costly mistakes such as scratches or chemical damage. Large projects, complicated window designs, or particularly stubborn paint layers benefit from professional intervention. How professionals remove paint from windows involves a systematic approach, combining mechanical and chemical techniques to achieve a streak-free finish without compromising safety or the window structure.
Knowing Your Limits and Avoiding Damage
Hire experts for old, fragile, or thickly painted windows. Their tools and experience prevent scratches and reduce removal time. Combining professional methods ensures complete removal while maintaining window integrity.
Table: Paint Removal Techniques Comparison
| Method | Best For | Pros | Cons | Safety Tips |
| Scraping | Thin or fresh paint | Fast, inexpensive | Can scratch glass | Hold at 45 degrees, gentle strokes |
| Razor Blade | Corners and edges | Precise control | Can scratch if pressed hard | Use shallow angle, small movements |
| Chemical Remover | Thick, stubborn paint | Dissolves paint easily | Requires ventilation and wait time | Wear gloves, avoid contact with frames |
| Heat Gun | Old layers | Softens paint effectively | High risk of glass damage | Keep moving, do not overheat |
Conclusion
Removing paint from windows requires patience, proper tools, and careful techniques. Understanding the challenges, using the right materials, and following step-by-step methods ensures successful results without damaging the glass or frames. Mechanical and chemical techniques can be combined to tackle stubborn paint, while attention to safety prevents injury or accidents. Protecting windows during future painting projects saves time and effort, keeping glass clear and pristine. For complex tasks or delicate windows, professional assistance offers the safest and most efficient solution. By following this guide, homeowners can restore windows effectively, achieving a clean, polished, and streak-free finish every time.
FAQs
1. How do I remove paint from windows without scratching?
Use a razor blade or scraper at a 45-degree angle with gentle strokes. Avoid pressing hard and test small areas first.
2. Can I remove old paint layers on glass?
Yes, soften thick paint with chemical removers or heat, then carefully scrape for effective results without damaging glass.
3. Are chemical paint removers safe for all windows?
They are safe if used as instructed. Avoid prolonged contact with delicate frames and ensure proper ventilation while working.
4. What tools are best for DIY window paint removal?
Scrapers, razor blades, microfiber cloths, and mild chemical paint removers are ideal for manual or combined removal techniques.
5. How do I clean windows after painting?
Use water, vinegar, or glass cleaner with microfiber cloths in circular motions, then buff dry for a streak-free finish.
6. Can I remove paint from window frames safely?
Yes, but use gentler methods for wooden or vinyl frames. Aluminum frames can tolerate stronger solutions with care.
7. How can I avoid future paint stains on windows?
Cover windows with plastic sheets or painter’s tape during painting and clean spills immediately to prevent stubborn stains.
8. Is DIY removal effective for stubborn paint spots on glass?
Yes, combining chemical removers with careful scraping can remove tough spots, but some situations may require professional help.